Hi Everyone,
There are compelling reasons to use Linux over Windows when hosting open source ERP, ADempiere and iDempiere, in the cloud. For example, Linux is less than half the price of windows when you consider the (a) AWS hourly cost and (b) user sessions maintained per MB of memory, CPU cycle and unit of storage required. This was a frustrating situation for me since I knew Windows much better than Linux and AWS Linux comes with no remote desktop management installed.
The purpose of this post is to help you drive down the cost of ERP cloud hosting by simplifying Linux management. I will teach you how to install and connect to a lightweight Linux desktop so that you can visually perform the needed installation and maintenance tasks. I also explain how to turn off the desktop so that you can maximize your memory and CPU cycles when the desktop is not needed. The belief is that by using the Linux desktop, as opposed to just command line, installation and maintenance processes become easier and more intuitive.
The below instructions are based on my learning experience. I hope they help!! Let me know if you have feedback to help improve this article. Also let me know of good tutorials that augment the below instructions.
============
Update 2013-12-09
You can automate much of the below by using “sudo apt-get install -y lubuntu-desktop xrdp”. Lubuntu installs LXDE and many of the nice apps below. xrdp enables you to connect to the desktop using any remote desktop client. The only downside to this approach is that you need to give your AWS ubuntu user a password using the “passwd” command. As long as your password is strong, you should be fine.
On a different note, please see Hai Dau’s comments below about using putty’s SSH for connecting via VNC.
============
Instructions:
- Create your AWS account if not already created.
- Go to the AWS EC2 section.
- Launch an AWS instance (classic wizard).
- Choose an Ubuntu LTS image. Note: if you find a good tutorial for this process, let me know and I will link it here.
- Install Putty on your local machine. This step assumes you are using Windows locally. Use the full Putty windows installer so the application shows up in your menu.
- Connect using Putty. Note: if you find a good tutorial for configuring security groups to allow for external access, key generation or putty configuration, let me know and I will link it here.
- Log into your newly created machine as “ubuntu”
- Issue command “sudo apt-get update”
- Note: If you want to see how much overhead is added by including remote desktop ability, run the command “top” and record the current memory usage.
- Issue command “sudo apt-get install lxde”. This installs the LXDE lightweight Linux desktop manager. Note: LXDE installation reference (link). If you do not want to use LXDE, you can also use gnome instead by issuing the command “sudo apt-get install ubuntu-desktop”.
- Issue command “sudo apt-get install chromium-browser leafpad epdfview xarchiver”. Note: this command installs some common tools for web, text editing, viewing PDFs and archives.
- Reboot your server – this may not be necessary; however, it helps ensure the LXDE desktop comes up when VNCServer comes up.
- Issue command “sudo apt-get install vnc4server” to install VNC (a remote desktop service for linux). Note: VNC installation reference (link)
- Issue command “vncserver” to start the VNC Server
- Issue command “vncserver -kill :1” to stop the server
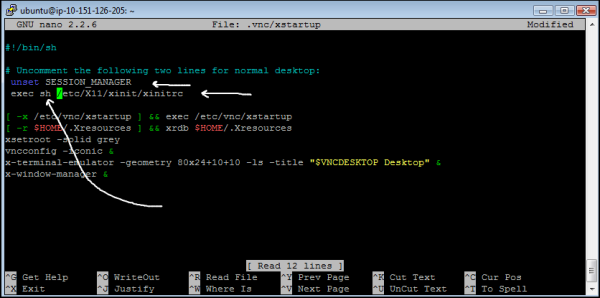
- Issue command “nano .vnc/xstartup” to edit the xstartup file.
- Uncomment the two lines pointed to below and add the ‘sh’ to the line with the arrow. Ctrl-x to save and close.
- Issue the command “vncserver” to start the server again. Note: You must issue this command every time the server is started if you wish to connect.
- Install tightVNC locally to access the LXDE desktop.
- Connect to your LXDE using the AWS IP address with a “:1” at the end (for example: ec2-53-221-103-105.compute-1.amazonaws.com:1)
Congratulations! At this point, you should see your new Linux desktop. You should now be able to do almost anything remotely that you can do locally. This includes loading the Eclipse IDE and ADempiere and iDempiere code bases. You can run the setup GUI for ADempiere and iDempiere. You can install PostgreSQL using the one-click installer if you wish.
Note: if you do not wish to go through the process of configuring a server, you can always request a pre-built AWS AMI. This AMI prevents you from needing to launch a clean server, configure it for easy use, install the typical tools, install ADempiere and iDempiere, install the ADempiere code base, configure the eclipse development environment, and more. Please note the AMI uses Windows. This is to ensure everyone has the opportunity to learn Open Source ERP. If you learn on the Windows AMI, you can always use the below instructions to lauch your production version of ADempiere or iDempiere on Linux.
Here are some notes to consider about the above instructions:
- LXDE should not launch when you start or reboot your server. This is my observation. I use the Linux command “top” to confirm.
- When you start VNCServer, the LXDE service also starts.
- When you kill the VNCServer, LXDE services also go away. This includes memory intensive process like the Chrome browser.
- It is commonly suggested that you issue the following command to prevent LXDE from launching at boot. I do not believe this is necessary with AWS; however, I will offer it for reference: “sudo mv /etc/init/lxdm.conf /etc/init/lxdm.conf.nostart”.
I hope this helps!! Please be quick to provide feedback if I can make this post better.
Using Putty to create SSH tunnel
This section was shared by Hai Dau – thanks!!
In Putty under SSH->Tunnels for Source Port enter ‘5901’
Destination enter ‘localhost::5901’
Select Add
Connect to establish SSH connection
Launch New TightVNC Connection
Remote host: enter ‘localhost::5901’
login window will popup to request password enter pwd for your vncserver then you should be good to go!
ADempiere vs iDempiere vs Openbravo vs Compiere
Please note that ADempiere, iDempiere and Openbravo are forks or copies from Compiere. Therefore, they have similar abilities mentioned above. The biggest difference is that ADempiere and iDempiere are pure open source. There are no features held behind a commercial or paid license.
About Chuck Boecking: I am an ERP educator. I believe that open source ERP have achieved mainstream capabilities, and as a result, more companies can create greater efficiency across their organization. I started using the iDempiere code base in 2003. Back then, it was called Compiere. In 2006, I started my first multi-million dollar installation. Since then, ADempiere has helped me create great success with distribution and manufacturing companies all over the world. My vision of success is to find companies that can best use open source ERP to help them achieve a single, global instance that drives a discontinuous increase in profitability. I believe that organizations win when they own their technology.
If you have questions, comments or concerns, let me know. I definitely want your feedback.
You can contact me by phone using 512.850.6068.
My email is chuck@chuboe.com.
You can complete the form on this page.
Thank you for taking the time. I look forward to speaking with you.
Regards,
Chuck Boecking
http://www.linkedin.com/pub/chuck-boecking/10/970/17b